Tip#101: Create your own LUT from 1 target image for video/animation/primary color grading

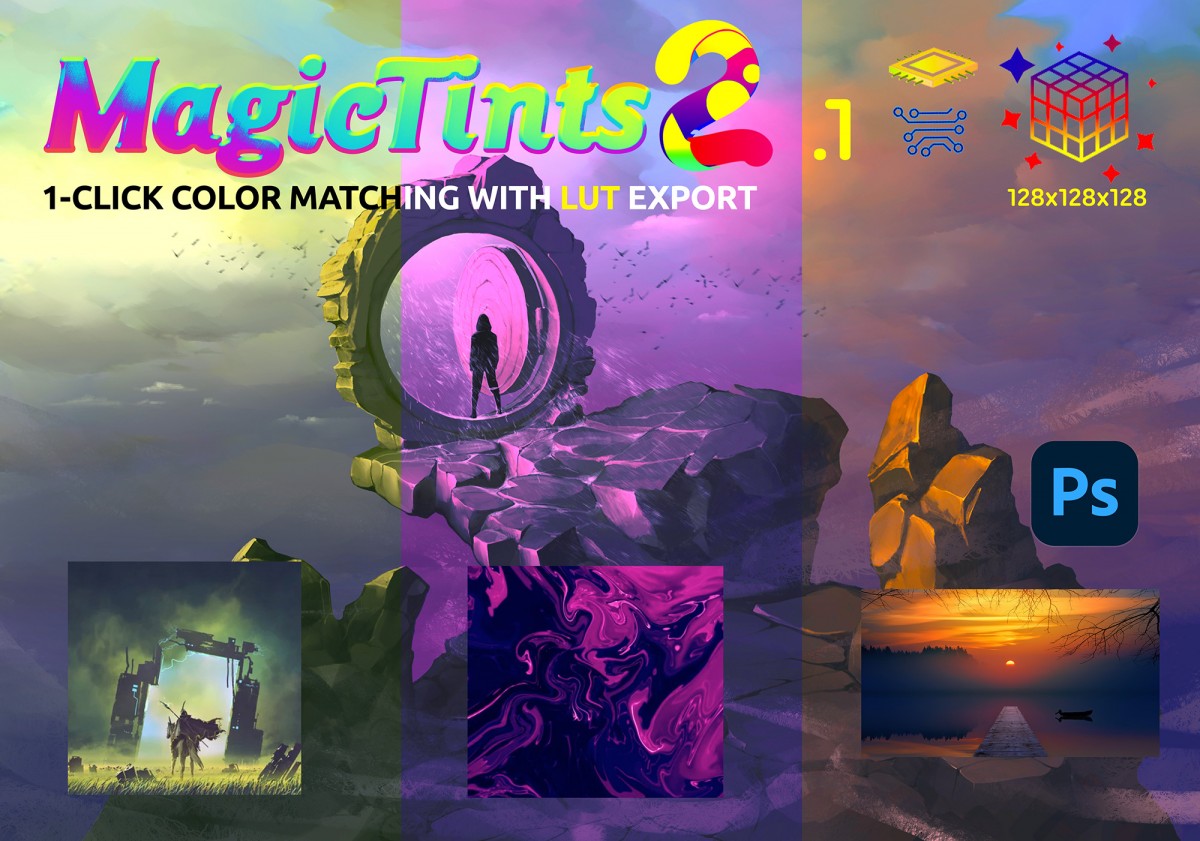
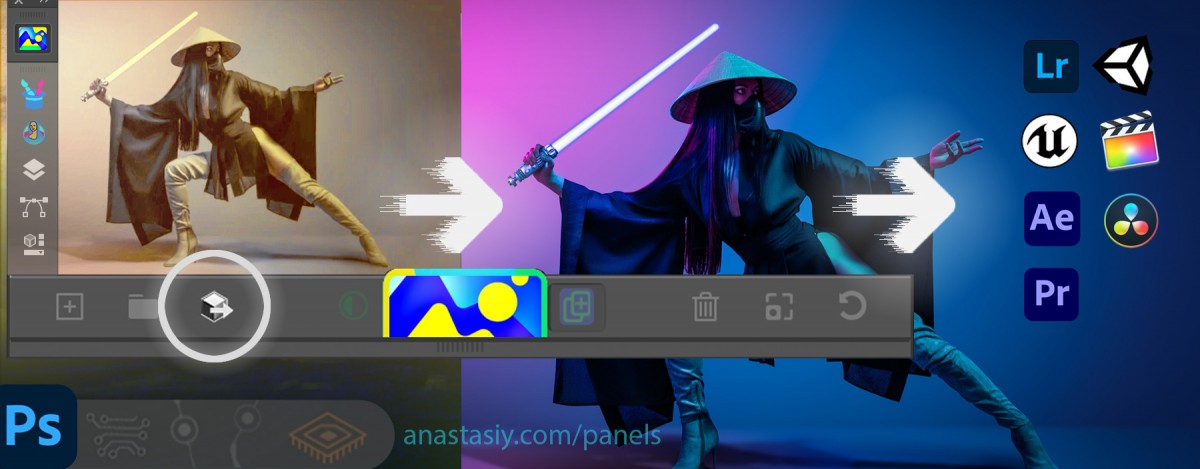
Create your very own, precise LUT in ❖ one click ❖, from a reference image in Adobe Photoshop. Then use it to color grade any footage or imagery in other software – for 3D, video, primary color grading, animation, in any post production.

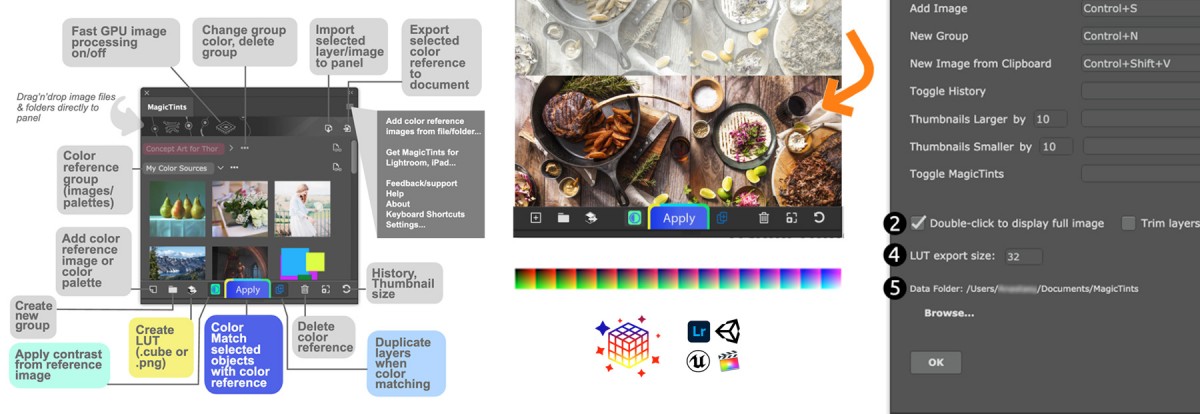
  1. Select a color reference image in MagicTints
  2. Click a button on the bottom toolbar and save .cube or .png. One click!

MagicTints exports LUT in any size. You can specify arbitrary LUT size in settings – for example 16x16x16, 17x17x17, or even 128x128x18.

From series of tutorials for MagicTints, 1-click color matching and LUT export


MagicTints 2.1! Faster LUT, up to x128 export

WHAT’S NEW

v2.1
– Now correctly works in the environment with two-byte characters (like Chinese)
– LUT 128x128x128 is now possible! Now correctly exports large LUTs of 64x64x64, 72x72x72, 128x128x128 etc..
– LUT generation is much faster
– LUTs are now much more precise, especially on big sizes (fixed problems with desaturation and banding)
– Now there are no limits on source image size when creating a LUT
– The GPU icon on the top is now less visible when GPU processing is disabled – to distinguish between sates
– Fixed a problem with partial color matching on AMD GPUs
– Fixed a problem with some LUTs (like 17x17x17 and 128x128x128) not opening in Photoshop and 3D/Video software

Upgrade MagicTints

Learn more about MagicTints – 1-click color matching and LUT export

Enjoy updated MagicTints 2.0 Manual

Learn how to:

  • Transfer a Color Scheme from one still image to another in Photoshop, Illustrator, InDesign
  • Generate a LUT from just a single color reference (LUT can be used to grade video footage in other DCC software, or in game engines like Unity and UE4)
  • Specify LUT size
  • Apply Contrast from one image to another
  • Import Color References to MagicTints
  • Enable/disable advanced GPU processing
  • Assign Keyboard Shortcuts
  • Paste color reference images from Clipboard
  • much more!

Read MagicTints manual 

Read more about MagicTints, the 1-click Color Matching and LUT export panel

Upgrade MagicTints to v2.0

Tip#100: Ways to activate full-featured color picking HUD

Looks like an anniversary of the tips&tricks series! 100th tip is ON.

Quickly get full-featured color picking HUD under your cursor in Adobe Photoshop. MagicPicker HUD shows up over normal Photoshop’s interface.

The HUD is more unique, intuitive and faster than normal Photoshop panels. It always pops up under your current cursor position. It’s very important especially if you use a Wacom-like tablet (no need to move your hand anywhere). It also auto-hides if you click anywhere on the document. MagicPicker HUD can also auto-hide when you release key/button.

MagicPicker 7: Advanced color picking HUD in Adobe Photoshop

You can activate MagicPicker HUD in the following ways:

  • Click “HUD” button on the panel
  • Click MagicPicker menu -> HUD mode
  • Assign keyboard shortcut in Settings and activate through keyboard any time
  • Assign same shortcut to Stylus button and call it with stylus
  • *Activate “Sticky HUD” mode from Settings to show HUD on press and hide on release of the key

HUD is available in MagicPicker starting from version 7.0.

From series of tutorials for MagicPicker, advanced color picker for Adobe Photoshop

Tip#99: Quickly and silently add new Photoshop brush/tool preset

Silently add new 🖌️🖌️ brush or tool presets in Photoshop using keyboard shortcut. In MagicSquire panel use Settings to define “Quick New Brush” shortcut. That’s it! One key press and your auto-named brush is in the group. No questions asked.

Quickly add new brush to group with MagicSquire panel for Adobe Photoshop

From series of tutorials about MagicSquire, the advanced brush group manager for Photoshop

Tip#98: How to fix Adobe products not showing up in Anastasiy’s Extension Manager

Fix for Anastasiy's Extension Manager list of Adobe products being empty
Fix for Anastasiy’s Extension Manager list of Adobe products being empty

If you experience one or more of the following problems with Anastasiy’s Extension Manager in Adobe Creative Suite (2021 included):

  • Only Photoshop is listed in the Anastasiy’s Extension Manager list (or only Adobe Illustrator)
  • Photoshop is absent on the extension list
  • Adobe extension list is empty/blank
  • Extensions don’t show up after installation on Photoshop or other Adobe Creative Cloud products (like InDesign, Illustrator or Adobe Premiere Pro)
  • Extension Manager doesn’t list your application or extension
  • ZXP extensions are not displayed in the Extension Manager after installation
  • Installation of Adobe extension failed

It’s easy to fix! First of all please make sure, you’re using the most recent version of Anastasiy’s Extension Manager – at least v3.6. Then:
1) Click File -> Reset extension list in the main menu of Anastasiy’s Extension Manager
2) That’s it! Now all Adobe products should appear and when you install new extensions (or reinstall old ones) they will re-appear on the list

Tip#97: GIANT color preview

GIANT color preview in Photoshop with magicPicker color wheel panel

See the 💙GIANT preview of current color with MagicPicker color wheel panel in #Photoshop and #Illustrator. Just Alt-Click on the color swatch

From series of tutorials for MagicPicker, advanced color wheel and color picker for Adobe Photoshop & Illustrator

Tip#96: Collections of groups of brushes with MagicSquire

Groups of Photoshop brushes can be further combined into sets with MagicSquire panel. Click MagicSquire menu -> Collections. Use different Collections of groups for different types of projects.

Switch collections in one click! Or use a keyboard shortcut (customizable from MagicSquire menu -> Keyboard Shortcuts).

MagicSquire: organizing groups of Photoshop brushes in Collections

From series of tutorials for MagicSquire, pro brush organizer for Photoshop

Tip#95: New MagicSquire’s right-click menu for brush presets

Right-click to duplicate Brush/Tool presets in MagicSquire

Right-click to duplicate Brush/Tool presets in MagicSquire

New MagicSquire 5 introduces a quick way to duplicate a Photoshop brush or tool preset. Just right-click on any tool preset and select “Duplicate …” from the menu! That’s it!  Also works with new brush preset HUD popup.

What required a fair number of steps now can be done easily with MagicSquire.

From series of tutorials for MagicSquire, pro brush with groups/tags in Photoshop

You can upgrade to MagicSquire 4 to duplicate brushes, use unique HUD popup and more – here

MagicSquire 4 brings quick brush pro HUD under cursor in Photoshop, sticky brushes, more

 – Improved visual performance
NEW! Load multiple .abr or .tpl files into a single group
NEW! Smart Search now gives you option to search closed groups
NEW! Unique HUD Mode! Popup MagicSquire anywhere on the screen under your cursor.
– Displayed via a keyboard shortcut (defined in Settings) & stylus/button click
– Click “HUD Mode” button on the panel
– Interactive and fully functional HUD! All MagicSquire functions work
– Sticky Mode (optional) show up on key down and hide on key up (also by stylus buttons)
– Go to MagicSquire Settings to activate Sticky mode for HUD
NEW! Sticky Brushes – completely new mode in Photoshop
– Press keyboard shortcut to activate brush and release to immediately deactivate it
– Allows you to switch to and switch back from your frequent brushes very fast
– Activate from New/Edit Brush Dialog -> Sticky
NEW! Duplicate Tool Preset by right-clicking it
NEW! Reset path to MagicSquire brushes folder to defaults (from Settings, using “Reset” button)
NEW! Number of hidden Collections is now displayed under “Collections/more…” in fly-out menu  NEW! Now you can activate brushes/tools in History from hidden Collections
  – much more

Upgrade MagicSquire to v4

Read more about MagicSquire, brush manager for Photoshop with tags, collections, sticky brushes