Tip#110: Using MagicPicker Transparent and Crystal HUD modes

Use new MagicPicker’s 🧿Crystal HUD mode or see your fantastic artwork through transparent panel.

  1. Change HUD Opacity in Settings or
  2. Enable background Blur
  3. Adjust HUD transparency 0-100
  4. Quickly call HUD with a shortcut
  5. Resize HUD the way need

From series of tutorials for MagicPicker, advanced Photoshop color wheel panel

Tip#109: Use new combinations of color spaces and sliders in MagicPicker

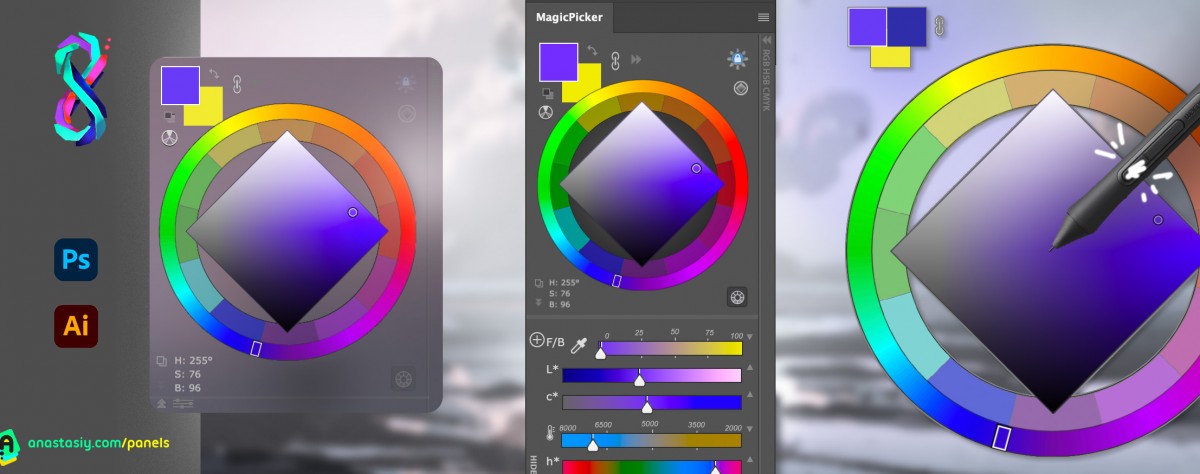
In MagicPicker 8 you can add any combination of any color spaces under the color wheel. These color spaces are added in the form of sliders that you can interact with and adjust colors.

Have HSB/CMYK/Lab combination, or HRB combination, or use new L*c*h color space that allows you to keep Hue in the same perceived brightness (same way as Tone Lock works). etc!

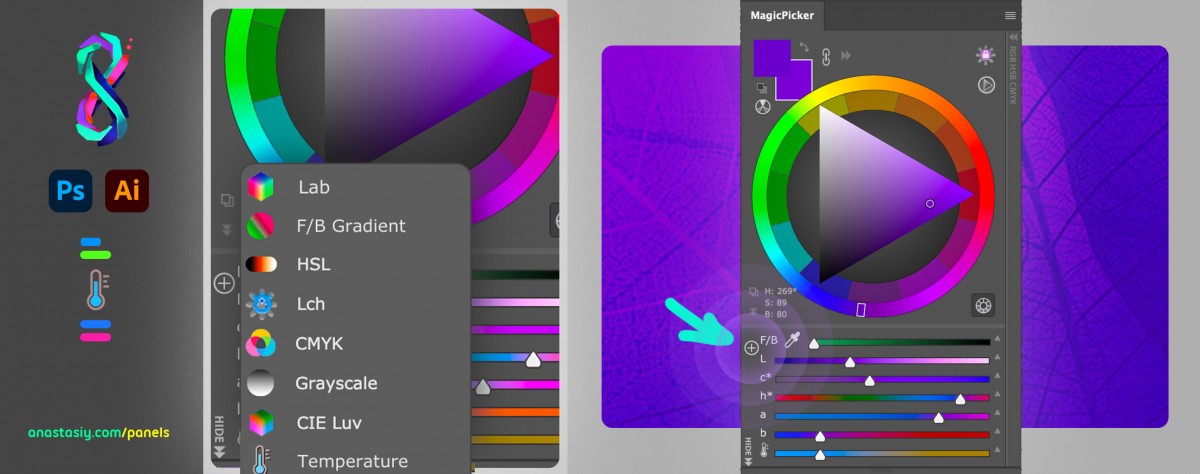
1) Click on the “Add Color Space” “+” button near sliders on the bottom
2) Choose any color space to add: Lab, F/B Gradient, HSL, L*c*h, CMYK, Grayscale, CIE Luv, HSB, RGB, Temperature
3) After adding color sliders you can remove any of them by dragging by its label
4) Rearrange sliders by dragging

Tip#108: Have a set of Photoshop Brush parameters under your fingertips with MagicSquire

You can now control your Photoshop Brush parameters with new interactive gauges and sliders. This gives you quick and direct access to brush parameters only crucial to your workflow.

Choose the parameters you need and arrange interactive Brush Controls on MagicSquire panel in #Photoshop.

Set colors, switch sliders/gauges.

  1. Simply click 🎛️ button
  2. Then grab, drag, delete or add with “+”
  3. Click the same 🎛️ button to exit edit mode
  4. Ready to rule your brush!

Now you will also have the same layout on the quick MagicSquire HUD popup under your cursor.

From series of tutorials for MagicSquire, advanced Photoshop brushes manager, now with Brush Controls!

Tip#107: Adjust MagicSquire the way you want

MagicSquire 5 is your ☃️ personal Brush Companion. Customize it the way you want!

Set up separate 🖌 Brush Controls as a quick right-click HUD popup or use as a part of the panel. Combine with PRO Mode.

  • Go to Settings and turn on HUD only controls Brush. After that you can set up keyboard shortcut to display HUD popup under your cursor where only Brush Controls are visible. If you turn it off you can display the whole panel in the HUD popup.

  • Turn on PRO Mode from MagicSquire menu

Now compatible with Photoshop 2022!

From series of tutorials for MagicSquire, advanced Photoshop brushes manager and brush control panel

Tip#106: Bring multiple objects to same palette with MagicTints

Select multiple layers

Select multiple pixel layers and then click “Apply” on MagicTints panel. That’s it! MagicTints will bring all selected objects to the same palette, from the Color Reference list. All at once.

  • You can choose specific colors or use any image as a target color reference. Works very accurately, transfers colors and contrast immediately.
  • You can also assign Keyboard Shortcut to that operation

Works in Photoshop, Illustrator, InDesign.

Or you can export LUT and use on any photo video in Affinity Photo, Lightroom, Premiere Pro, AfterEffects, Final Cut or even in 3D software like Unity, Blender or Unreal Engine.

MagicTints is also available as a standalone app on macOS or Windows.

From series of tutorials for MagicTints, 1-click accurate color matching

Tip#105: What is HUD?

In HUD mode the Photoshop panel shows up under your cursor whenever you click a keyboard shortcut. (Or press the HUD button on the panel). button_HUD_light@2x Staying hidden when you don’t need it – saving your valuable screen real estate.

The HUD mode is new to MagicPicker 7 and MagicSquire 4.

Ways to activate Brush HUD popup under cursor in Photoshop
MagicSquire Brush Manager in HUD mode

All the features of the panels are available in this mode. Also if you experience problems with Wacom stylus in Photoshop then HUD will fix all those problems.

All power of MagicPicker color wheel, including color schemes, color tone lock, K-lock, various modes of the wheel are available in this mode. Unlike Photoshop’s native limited HUD the MagicPicker is fully featured.

MagicSquire also supports this mode, making all your brushes available under cursor.

You can also use it in “Sticky” mode when you press a button to show the HUD and release it to hide. You can also bind it to your stylus button.

Here are the ways to activate HUD.

From series of tutorials for MagicPicker, the pro Photoshop color wheel and MagicSquire, advanced Photoshop brush manager


Tip#104: Match elements from different photos 🍭 in one click

1) Bring backdrop into MagicTints as color reference by clicking a Screen Shot 2021-07-20 at 9.00.52 PM down arrow on the toolbar
2) Select another object (image, layer, group of images) and click “Apply”

The elements will precisely color match (keeping contrast etc.) Apply to illustrations, 3D renders, photos. Works in Photoshop, Illustrator, InDesign plugin.
Also works in a MagicTints Desktop App on macOS and Windows – just use transparent PNGs for objects.

3)* You can use the same technique in video software like AfterEffects, Premiere or Final Cut Pro – by applying LUT exported from MagicTints

From series of tutorials for MagicTints, 1-click precise color matching app

Standalone Color Matching/Correction super-desktop app from Anastasiy

The wait is over!
New MagicTints 2 Desktop can quickly switch any image’s colors — without Adobe CC. Works on macOS and Windows.
Crazy fast 1-click GPU-based Color Matching between images. Adjust Mood, bring Multiple images to the same color palette. Use with any software!
FEATURES:
– Use it together with any software: Affinity Photo, Lightroom, Sketch, Unity, GIMP, Final Cut, AfterEffects, Pixelmator. No CC subscription required. 2x faster than plugin!
– Exports LUT or images
– Brings multiple images to the color and aesthetics of existing image
– Switch lighting conditions or mood of any concept art, photo or texture
– Keep original micro-contrast, dynamic range, subtle details
– Smartest color correction ever! Accuracy on subpixel level. Machine Learning core handles 8K+ resolutions. Uses your NVidia, Apple M1 or AMD GPU
– uses MagicPicker UI engine for faster speeds.
– more

Tip#103: Ways to activate MagicSquire brush HUD popup under cursor

1) Click HUD button on MagicSquire panel

2) Click MagicSquire menu -> HUD Mode

3) Go to Settings (menu -> Settings) of MagicSquire panel and assign a keyboard shortcut

4*) Assign same key to Stylus/mouse click to activate it using mouse click or stylus

5*) Use Sticky HUD mode to display HUD on keypress and auto-hide it on key release (same with Stylus button)

From series of tutorials for MagicSquire, advanced brush group manager for Adobe Photoshop

Tip#102: Adjust color relations in MagicPicker’s Color Schemes

Quickly adjust connection between colors in Color Schemes of MagicPicker.
  • Simply click on a complementary color (round pointer) to move it – other color will auto-adjust
  • Click on main color (rectangular pointer) to rotate whole Color Scheme.
  • Ctrl-click to pick a color.

Works in Triadic, Tetradic etc. modes

From series of tutorials for MagicPicker, pro Illustrator and Photoshop color wheelÂ